编写ESLint插件-浅谈AST AST 全称 Abstract Syntax Tree ,翻译为抽象语法树,是前端工程化绕不开的一个名词,目前前端常用的一些插件或者工具,比如说javascript 转译、代码压缩、css 预处理器、eslint、pretiier 等功能的实现,都是建立在 AST 的基础之上,webpack、eslint 等很多工具库的核心都是通过抽象语法书这个概念来实现对代码的检查、分析等操作。本文将会介绍 AST 的概念、原理以及用途,并通过开发一个 ESLint 插件来加深对 AST 概念的理解。
基本概念
抽象语法树(Abstract Syntax Tree,AST),或简称语法树(Syntax tree),是源代码语法结构的一种抽象表示。它以树状的形式表现编程语言的语法结构,树上的每个节点都表示源代码中的一种结构。
我们先看一下如下代码
1 import React from 'react' ;
再看一下抽象语法树转换后的代码
1
2
3
4
5
6
7
8
9
10
11
12
13
14
15
16
17
18
19
20
21
22
23
24
25
26
27
28
29
30
31
32
33
{ "type" : "Program" , "start" : 0 , "end" : 207 , "body" : [ { "type" : "ImportDeclaration" , "start" : 179 , "end" : 205 , "specifiers" : [ { "type" : "ImportDefaultSpecifier" , "start" : 186 , "end" : 191 , "local" : { "type" : "Identifier" , "start" : 186 , "end" : 191 , "name" : "React" } } ], "source" : { "type" : "Literal" , "start" : 197 , "end" : 204 , "value" : "react" , "raw" : "'react'" } } ], "sourceType" : "module" }
AST 的本质就是一个树形结构的对象,AST 是对 JS 源码的抽象,字面量、标识符、表达式、语句、模块语法、class 语法 都有各自的抽象语法树节点(Node)。一个 AST 可以由单一的节点或是成百上千个节点构成,它们组合在一起可以描述用于静态分析的程序语法。
上例中,在最外层的 type、start、end、body、sourceType 中,我们主要看中间 body 部分,这里的 body 的第一个对象内容就是对应import语句,这是一个 type 为 ImportDeclaration 类型的对象,每个对象都有 type、start、end、这几个字段。
其中 type 表达当前块的类型,比如ImportDefaultSpecifier 表示声明语句,FunctionDeclaration 表示函数定义,Identifier 表示标识符、BlockStatement 表示块语句、ReturnStatement 表示返回语句等。
start 表示该块开始的位置,end 表示该块结束的位置。
specifiers 是一个数组,描述的导入的具体的成员变量,source 字段标识引入的库信息,其中 value 值为引入的变量名
使用 astexplorer 可以在线将任意对象,表达式转换为 AST 语法树。
AST的用途
常用各类转义、编译的插件中。比如最典型的 ES6 转换为 ES5 工具 、JSX 语法转换为 JavaScript 语法,即 babel 模块。
代码语法的检查,比如代码规范工具 ESLint 模块。
各类 JS/CSS/HTML 压缩工具。
语法检查、代码风格检查、格式化代码、语法高亮、错误提示、自动补全等
比如说,有个函数 function a() {} 我想把它变成 function b() {},或者在 webpack 中代码编译完成后 require('a') --> __webapck__require__("*/**/a.js"),这些都是 AST 的用途。
将代码转换成AST 一个对象生成 AST 的关键所在是词法分析和语法分析。对于JavaScript而言,可以通过JS Parser将JS代码转换成AST,目前比较常见的JS Parser如下:
词法分析
JavaScript 编译执行流程:js 执行的第一步是读取 js 文件中的字符流,然后通过词法分析生成 token,之后再通过语法分析生成 AST(Abstract Syntax Tree),最后生成机器码执行。
词法分析指的是将对象逐个扫描(scanner),调用 next() 方法,一个字母一个字母的来读取字符,然后与定义好的 JavaScript 关键字符做比较,生成对应的 Token。所谓 Token 是最小的不可分割单元,像是下例中的 const 就已经无法被分割了,它就是一个 Token。类似 const 这样,每个关键字、标识符、操作符、标点符号等都是一个 Token,词法分析器会过滤掉源程序中的注释和空白字符(换行符、空格、制表符等)。最终词法分析会生成由对象组成的一维数组(Tokens列表)。
1
2
3
4
5
6
7
const a = 5 ;[ { value :'const' , type :'keyword' }, { value :'a' , type :'identifier' } ... ]
每一个 type 有一组属性来描述该令牌:
1
2
3
4
5
6
7
8
9
10
11
12
13
14
15
16
{ type : { label : 'name' , keyword : undefined , beforeExpr : false , startsExpr : true , rightAssociative : false , isLoop : false , isAssign : false , prefix : false , postfix : false , binop : null , updateContext : null }, ... }
语法分析 语法分析指的是将有关联的对象整合成树形结构的表达形式。语法分析会将词法分析出来的 Token 转化成有语法含义的抽象语法树结构。同时,验证语法,语法如果有错的话,抛出语法错误。
1
2
3
4
5
6
7
8
9
10
11
12
13
14
15
16
17
18
19
20
21
22
23
24
25
26
27
28
29
30
31
32
33
34
35
36
const a = 5 ;{ "type" : "Program" , "start" : 0 , "end" : 12 , "body" : [ { "type" : "VariableDeclaration" , "start" : 0 , "end" : 12 , "declarations" : [ { "type" : "VariableDeclarator" , "start" : 6 , "end" : 11 , "id" : { "type" : "Identifier" , "start" : 6 , "end" : 7 , "name" : "a" }, "init" : { "type" : "Literal" , "start" : 10 , "end" : 11 , "value" : 5 , "raw" : "5" } } ], "kind" : "const" } ], "sourceType" : "module" }
实践转换过程 在这一章节,我们站在巨人的肩膀上,使用esprima 完成从 let a = 1; 到 let b = 2; 的过程。
第一步,我们使用 astexplorer 观察一下 let a = 1; 对应的AST:
1
2
3
4
5
6
7
8
9
10
11
12
13
14
15
16
17
18
19
20
21
22
23
24
25
26
27
28
29
30
31
32
33
34
{ "type" : "Program" , "start" : 0 , "end" : 190 , "body" : [ { "type" : "VariableDeclaration" , "start" : 179 , "end" : 189 , "declarations" : [ { "type" : "VariableDeclarator" , "start" : 183 , "end" : 188 , "id" : { "type" : "Identifier" , "start" : 183 , "end" : 184 , "name" : "a" } , "init" : { "type" : "Literal" , "start" : 187 , "end" : 188 , "value" : 1 , "raw" : "1" } } ] , "kind" : "let" } ] , "sourceType" : "module" }
第二步,我们使用 astexplorer 观察一下 let b = 2; 对应的AST:
1
2
3
4
5
6
7
8
9
10
11
12
13
14
15
16
17
18
19
20
21
22
23
24
25
26
27
28
29
30
31
32
33
34
{ "type" : "Program" , "start" : 0 , "end" : 190 , "body" : [ { "type" : "VariableDeclaration" , "start" : 179 , "end" : 189 , "declarations" : [ { "type" : "VariableDeclarator" , "start" : 183 , "end" : 188 , "id" : { "type" : "Identifier" , "start" : 183 , "end" : 184 , "name" : "b" } , "init" : { "type" : "Literal" , "start" : 187 , "end" : 188 , "value" : 2 , "raw" : "2" } } ] , "kind" : "let" } ] , "sourceType" : "module" }
第三步,对比一下发现前后不同在于type为Identifier的id的name属性值不一样,以及type为Literal的init的value属性值不一样。接下来,我们需要安装estraverse (遍历AST)和escodegen (根据AST生成JS)这两个包,遍历AST树并修改 Node 属性,便可以完成转换过程。
1
2
3
4
5
6
7
8
9
10
11
12
13
14
15
16
17
18
19
20
21
22
23
24
const esprima = require ('esprima' );const estraverse = require ('estraverse' );const escodegen = require ('escodegen' );const program = "let a = 1;" ;const ASTree = esprima.parseScript (program);function changeAToB (node ) { if (node.type === 'Identifier' ) { node.name = 'b' ; } if (node.type === 'Literal' ) { node.value = 2 } } estraverse.traverse (ASTree , { enter (node ) { changeAToB (node); } }); const ASTreeAfterChange = escodegen.generate (ASTree );console .log (ASTreeAfterChange );
常见的AST节点 Identifier 1 2 3 4 interface Identifier <: Expression , Pattern { type : "Identifier" ; name : string ; }
标识符,就是我们写 JS 时自定义的名称,如变量名,函数名,属性名,都归为标识符,值存放于字段name中。
ImportSpecifier 1 2 3 4 interface ImportSpecifier <: ModuleSpecifier { type : "ImportSpecifier" ; imported : Identifier ; }
单独导出的成员变量,描述的是例如 import { Message as MyMessage } from 'element-ui' 中的Message。local和imported字段,其都是 identitifier 类型,其 name 属性在没有进行别名处理时相同,如果使用了别名则 local 中的 name 则为别名,imported 为原始成员变量名。
1 2 3 4 5 6 7 8 9 10 11 12 13 14 15 16 17 18 19 { "body" : [ { "specifiers" : [ { "imported" : { "type" : "Identifier" , "name" : "Message" } , "local" : { "type" : "Identifier" , "name" : "MyMessage" } } ] , } ] , }
ImportDefaultSpecifier 1 2 3 interface ImportDefaultSpecifier <: ModuleSpecifier { type : "ImportDefaultSpecifier" ; }
描述的是形如import _ from "lodash"中的_
1 2 3 4 5 6 7 8 9 10 11 12 13 14 15 16 17 { "body" : [ { "type" : "ImportDeclaration" , "specifiers" : [ { "type" : "ImportDefaultSpecifier" , "local" : { "type" : "Identifier" , "name" : "_" } } ] , } ] , }
CallExpression 1 2 3 4 5 interface CallExpression <: Expression { type : "CallExpression" ; callee : Expression | Super | Import ; arguments : [ Expression | SpreadElement ]; }
函数调用表达式,比如:setTimeout(()=>{}),callee 属性是一个表达式节点,表示函数,arguments 是一个数组,元素是表达式节点,表示函数参数列表。
1 2 3 4 5 6 7 8 9 10 11 12 13 14 15 16 17 18 19 20 21 22 23 24 25 26 27 { "type" : "Program" , "body" : [ { "type" : "ExpressionStatement" , "expression" : { "type" : "CallExpression" , "callee" : { "type" : "Identifier" , "name" : "setTimeout" } , "arguments" : [ { "type" : "ArrowFunctionExpression" , "params" : [ ] , "body" : { "type" : "BlockStatement" , "body" : [ ] } } ] , "optional" : false } } ] , }
MemberExpression 1 2 3 4 5 6 interface MemberExpression <: Expression , Pattern { type : "MemberExpression" ; object : Expression | Super ; property : Expression ; computed : boolean ; }
成员表达式节点,即表示引用对象成员的语句,object是引用对象的表达式节点,property 是表示属性名称,computed 如果为 false,是表示 . 来引用成员,property 应该为一个 Identifier 节点,如果 computed 属性为 true,则是 [] 来进行引用,即 property 是一个 Expression 节点,名称是表达式的结果值
1 2 3 4 5 6 7 8 9 10 11 12 13 14 15 16 17 18 19 20 21 22 { "type" : "Program" , "body" : [ { "type" : "ExpressionStatement" , "expression" : { "type" : "MemberExpression" , "object" : { "type" : "Identifier" , "name" : "window" } , "property" : { "type" : "Identifier" , "name" : "setTimeout" } , "computed" : false , "optional" : false } } ] , }
AssignmentExpression 1 2 3 4 5 6 interface AssignmentExpression <: Expression { type : "AssignmentExpression" ; operator : AssignmentOperator ; left : Pattern | Expression ; right : Expression ; }
赋值表达式节点,operator 属性表示一个赋值运算符,left 和 right是赋值运算符左右的表达式。
1 2 3 4 5 6 7 8 9 10 11 12 13 14 15 16 17 18 19 20 21 22 23 24 25 26 27 28 29 30 31 32 33 34 35 36 { "type" : "Program" , "body" : [ { "type" : "VariableDeclaration" , "declarations" : [ { "type" : "VariableDeclarator" , "id" : { "type" : "Identifier" , "name" : "a" } , "init" : null } ] , "kind" : "let" } , { "type" : "ExpressionStatement" , "expression" : { "type" : "AssignmentExpression" , "operator" : "=" , "left" : { "type" : "Identifier" , "name" : "a" } , "right" : { "type" : "Literal" , "value" : 20 , "raw" : "20" } } } ] , }
ArrayExpression 1 2 3 4 interface ArrayExpression <: Expression { type : "ArrayExpression" ; elements : [ Expression | SpreadElement | null ]; }
数组表达式节点,const array = [d,2,3], elements 属性是一个数组,表示数组的多个元素,每一个元素都是一个表达式节点。
1 2 3 4 5 6 7 8 9 10 11 12 13 14 15 16 17 18 19 20 21 22 23 24 25 26 27 28 29 30 31 32 33 34 35 36 37 38 { "type" : "Program" , "body" : [ { "type" : "VariableDeclaration" , "declarations" : [ { "type" : "VariableDeclarator" , "id" : { "type" : "Identifier" , "name" : "array" } , "init" : { "type" : "ArrayExpression" , "elements" : [ { "type" : "Identifier" , "name" : "d" } , { "type" : "Literal" , "value" : 2 , "raw" : "2" } , { "type" : "Literal" , "value" : 3 , "raw" : "3" } ] } } ] , "kind" : "const" } ] , }
VariableDeclaration 1 2 3 4 5 interface VariableDeclaration <: Declaration { type : "VariableDeclaration" ; declarations : [ VariableDeclarator ]; kind : "var" | "let" | "const" ; }
变量声明表达式,kind 属性表示是什么类型的声明,值可能是var/const/let。declarations表示声明的多个描述,因为我们可以这样:let a = 1, b = 2
1 2 3 4 5 6 7 8 9 10 11 12 13 14 15 16 17 18 19 { "type" : "Program" , "body" : [ { "type" : "VariableDeclaration" , "declarations" : [ { "type" : "VariableDeclarator" , } , { "type" : "VariableDeclarator" , } ] , "kind" : "let" } ] , "sourceType" : "module" }
LogicalExpression 1 2 3 4 5 6 interface LogicalExpression <: Expression { type : "LogicalExpression" ; operator : LogicalOperator ; left : Expression ; right : Expression ; }
逻辑运算表达式, || 或者 &&。
ConditionalExpression 1 2 3 4 5 6 interface ConditionalExpression <: Expression { type : "ConditionalExpression" ; test : Expression ; alternate : Expression ; consequent : Expression ; }
条件表达式即三元运算表达式:boolean ? true : false。
IfStatement 1 2 3 4 5 6 interface IfStatement <: Statement { type : "IfStatement" ; test : Expression ; consequent : Statement ; alternate : Statement | null ; }
if 表达式,if(true),test 属性表示 if (...) 括号中的表达式。 consequent 属性是表示条件为 true 时的执行语句,通常会是一个块语句。 alternate 属性则是用来表示 else 后跟随的语句节点,通常也会是块语句,但也可以又是一个 if 语句节点,即类似这样的结构:if (a) { ... } else if (b) { ... }。alternate 当然也可以为 null。
ESLint简要介绍 ESLint 由 JavaScript 红宝书 作者 Nicholas C. Zakas 编写, 2013 年发布第一个版本。ESLint 是以可扩展、每条规则独立、不内置编码风格为理念编写的一个 lint 工具。
ESLint 主要有以下特点:
默认规则包含所有 JSLint、JSHint 中存在的规则,易迁移;
规则可配置性高:可设置「警告」、「错误」两个 error 等级,或者直接禁用;
包含代码风格检测的规则
支持插件扩展、自定义规则
ESLint 详尽使用参见 官方文档 。
ESLint 的核心在于约束,通过各种规则 rule 进行约束。JS是一个随心所欲的动态语言,我们需要各类规则约束代码,使其可读性更高,代码更健壮,工程更可靠。规则的本质就是前人的经验总结,将经验抽象为规则使团队成员共享最佳实践。
ESLint基本配置 我们通常在 eslintrc 文件中配置 eslint,其中包括以下这些配置项。
parser 功能 :将代码转换为 eslint 能理解的 AST 语法树,支持我们对非标准 JS 语法添加 Lint。
parser 是解析器,其功能对应编译原理中的词法分析、语法分析。如果需要其他功能,则可以使用额外的 parse 配置,如解析 TS 代码时使用 typescript-eslint/parser,使用了 babel 时使用 @babel/eslint-parser 等。
1 2 3 module .exports = { "parser" : "@typescript-eslint/parser" , }
parserOptions 对于解析器的配置。常用的属性有以下几个:
ecmaVersion: latest: 配置代码的 js 版本,告知 ESLint 我们想要支持什么版本的 JS 语法sourceType: 'module': 源码类型,是否允许使用export / importecmaFeatures: { jsx: true }:告知 ESLint 是否使用 jsx
rules 一条 rule 就是单独的一条规则,针对一个具体问题,例如不允许使用 console.time() 。
1 2 3 4 5 6 { "rules" : { "semi" : ["error" , "always" ], "quotes" : ["error" , "double" ] } }
semi 和 quotes 是 rules 的名字,第一个值是规则的错误等级,有一下三类:
"off" 或 0 - 关闭规则"warn" 或 1 - 将规则视为警告"error" 或 2 - 将规则视为错误
三个错误等级让我们可以方便控制 ESLint 如何应用这些规则,此外还可以传入 options,用于灵活的配置规则,本文将会编写的规则便需要自定义 options。
我们在 .eslintrc.* 中配置的 rules 字段是规则,我们在代码中写的注释,例如 // eslint-disable-next-line @typescript-eslint/no-unused-vars 也是规则,两部分合并起来得到了最终的 rule。
得到了最终 rule 之后,深度优先遍历源码生成的 AST,将 node 存放到 ESLint 内部维护的队列中,然后遍历所有规则,为规则中所有的选择器添加监听事件,在触发时执行,触发队列中包含的事件就会返回显示给用户的 lintingProblems。在 ESLint 中应用 rule 是一个事件驱动的好范例。
plugins 针对特殊语法自定义的那些规则我们称之为eslint 插件,插件为一系列规则 rules 的合集,一般作为一个 plugin,如一个 plugin 是用来规范变量命名的,那么它可能包含对于普通变量的 rule,对于导出常量的 rule,对于组件命名的 rule,对于样式命名的 rule 等等。
常见的插件有: eslint-plugin-import、eslint-plugin-promise、eslint-plugin-react。ESLint 本身规则只会去支持标准的 ECMAScript 语法,如果我们想在 React 中也使用 ESLint 则需要自己去定义一些规则,就有了 eslint-plugin-react 。
extends 一系列 plugins 的合集,如 Google 的 gts。根据要求,extends 的命名都以eslint-config-为开头,在配置 extends 时可以省略这个前缀。引入的 extends 可以是 npm 包,也可以是本地路径。plugins 的配置仅仅代表在项目中引入了哪些规则,并没有指明该规则是警告、报错、忽略,extends 要做的就是引入 eslint 推荐的规则设置。按照 eslint 插件的开发规范,每个插件的入口文件都会导出一个对象,其中就有一个 configs 字段,该字段是个对象,他可以把该插件已有的规则分成不同的风格。
1 2 3 4 5 module .exports = { "extends" : "airbnb" };
Airbnb JavaScript Style Guide 是最出名的社区实践之一,上述 airbnb 为 eslint-config-airbng 的缩写,这里的意思是让 ESLint 将 eslint-config-airbng 的规则做为拓展引用到我们自己的项目中来。
overrides 若要对某些文件进行更细致的定制化,则在overrides字段中进行配置。
settings 用于配置全局共享的设置,官方文档 。
env 设置代码的运行环境,如 node 环境还是 browser 环境。在设置 env 后可以使用对应的全局变量。 除了预定义的字段外,也可以开启某个 plugin 中的某种环境
1 2 3 4 5 "env" : { "browser" : true , "es6" : true , "node" : true , },
编写自己的ESLint插件 此插件的目的在于对 import 项分组整理,达成以下效果:
1 2 3 4 5 6 7 import React , {useEffect} from 'react' ;import styles from './index.module.scss' import Footer from "@layout/footer" ;import Header from "@layout/header" ;
开发过程 新建项目 我们使用官方推荐的 Yeoman generator 开发插件,依次运行以下指令
1 2 3 4 npm i -g yo npm i -g generator-eslint yo eslint :plugin yo eslint :rule
运行完上述指令后,我们会得到如下所示的文件树
1 2 3 4 5 6 7 8 9 10 11 12 13 14 15 . ├── README .md ├── docs │ └── rules │ └── import -order-demo005.md ├── lib │ ├── index.js │ └── rules │ └── import -order-demo005.js ├── package-lock.json ├── package.json └── tests └── lib └── rules └── import -order-demo005.js
编写自定义规则 解析context对象需要用到 eslint 提供的多个方法,我们主要参考官方中文文档:https://cn.eslint.org/docs/developer-guide/working-with-rules,具体涉及到的方法用途写在了代码注释中。[working-with-plugins ](https://eslint.org/docs/latest/developer-guide/working-with-plugins ) 和 working-with-rules 这两篇官方文档能够帮助我们更好地理解如何编写自定义规则。
1 2 3 4 5 6 7 8 9 10 11 12 13 14 15 16 17 18 19 20 21 22 23 24 25 26 27 28 29 30 31 32 33 34 35 36 37 38 39 40 41 42 43 44 45 46 47 48 49 50 51 52 53 54 55 56 57 58 59 60 61 62 63 64 65 66 67 68 69 70 71 72 73 74 75 76 77 78 79 80 81 82 83 84 85 86 87 88 89 90 91 92 93 94 95 96 97 98 99 100 101 102 103 104 105 106 107 108 109 110 111 112 113 114 115 116 117 118 119 120 121 122 123 124 125 126 127 128 129 130 131 132 133 134 135 136 137 138 139 140 141 142 143 144 145 146 147 148 149 150 151 152 153 154 155 156 157 158 159 160 161 162 "use strict" ;module .exports = { meta : { type : 'suggestion' , docs : { description : "Group import decorations in React projects" , recommended : false , url : null , }, fixable : 'code' , schema : [{ type : 'object' , }], messages : { sort : '运行ESLint规则来整理import分组' , nameComment : '分组注释错误' , intervalComment : '同组的节点之间存在多余注释' }, }, create (context ) { const options = context.options [0 ] || { "react" : "^react" , "style" : ".(css|scss|less|sass)$" , "common" : ".(png|jpg|jpeg|svg|gif|json)$" , "hooks" :"/hooks/" , "src" : "@src/" , }; const groups = []; for (let name in options) { const reg = options[name]; groups.push ({ name, reg, imports : [] }) } if (!options['other' ]) { groups.push ({ name : 'other' , rules : '.*' , imports : [], }) } function isGroupNameError (node, name ) { const sourceCode = context.getSourceCode (); const commentsBefore = sourceCode.getCommentsBefore (node); return { noNameComment : !commentsBefore.length , groupNameIsError : commentsBefore.length && commentsBefore[commentsBefore.length - 1 ].value !== ` ${name} ` } } return { Program : programNode => const sourceCode = context.getSourceCode (); const importNodes = []; for (const node of programNode.body ) { if (node.type === 'ImportDeclaration' ) { importNodes.push (node); for (let group of groups) { const regex = new RegExp (group.reg , 'ig' ); if (regex.test (node.source .value )) { if (Boolean (group.imports ) === false ) { group.imports = []; } group.imports .push ({ idx : group.imports .length , name : group.name , node, }); break ; } } } } let orderImport = []; for (let group of groups) { orderImport = orderImport.concat (group.imports ); } for (let index = 0 ; index < importNodes.length ; index++) { const node = importNodes[index]; const prevNode = importNodes[index - 1 ]; const orderedNode = orderImport[index]; const prevOrderedNode = orderImport[index - 1 ]; const nowText = sourceCode.getText (node); const orderedNodeText = sourceCode.getText (orderedNode.node ); if (nowText !== orderedNodeText) { context.report ({ node, messageId : 'sort' , fix : fixer =>replaceText (node, orderedNodeText), }); } else { const { noNameComment, groupNameIsError } = isGroupNameError (orderedNode.node , orderedNode.name ) const isFirstNodeAndCommentErr = orderedNode.idx === 0 && (noNameComment || groupNameIsError); const otherNodeAndCommentErr = orderedNode.idx != 0 && groupNameIsError if (isFirstNodeAndCommentErr || otherNodeAndCommentErr) { context.report ({ node, messageId : 'nameComment' , fix : fixer =>insertTextBeforeRange (node.range , `// ${orderedNode.name} \n` ), }); } if (prevNode && prevOrderedNode && sourceCode.commentsExistBetween (prevNode, node) && prevOrderedNode.name === orderedNode.name ) { context.report ({ node, messageId : 'intervalComment' , fix : fixer =>removeRange ([prevNode.range [1 ] + 1 , node.range [0 ] - 1 ]), }); } } } } }; }, };
编写测试用例 1 2 3 4 5 6 7 8 9 10 11 12 13 14 15 16 17 18 19 20 21 22 23 24 25 26 27 28 29 30 31 32 33 34 35 36 37 38 39 40 41 42 43 44 45 46 47 48 49 50 51 52 53 54 55 56 57 'use strict' ;'use strict' ;const rule = require ("../../../lib/rules/eslint-plugin-group-import-decorations" )const { RuleTester } = require ('eslint' );const ruleTester = new RuleTester ({ parserOptions : { ecmaVersion : 2020 , sourceType : 'module' , }, }); ruleTester.run ('eslint-plugin-group-import-decorations' , rule, { valid : [ { code : ` // react import React, { ReactNode, useEffect, useMemo, useRef, useState } from 'react'; import { useLocation } from 'react-router-dom'; // style import './index.scss'; // hooks import useInterval from 'src/hooks/useInterval'; // common import noneImg from '../../common/imgs/empty.png'; ` , errors : 1 , options : [{ "react" : "^react" , "style" : ".(css|scss|less|sass)$" , "src" : "@src/" , "common" : ".(png|jpg|jpeg|svg|gif|json)$" , "hooks" :"/hooks/" , }], } ], invalid : [ { code : ` import React, { ReactNode, useEffect, useMemo, useRef, useState } from 'react'; import { useLocation } from 'react-router-dom'; import './index.scss'; ` , errors : 1 , options : [{ "react" : "^react" , "style" : ".(css|scss|less|sass)$" , "src" : "@src/" , "common" : ".(png|jpg|jpeg|svg|gif|json)$" , "hooks" :"/hooks/" , }], }, ], });
导出并发布 我们的插件至此开发完成,接下来需要编写对 eslint 暴露这个模块的代码。
1 2 3 4 5 6 7 8 9 10 11 12 13 14 15 16 17 18 19 20 21 22 "use strict" ;const requireIndex = require ("requireindex" );module .exports .rules = requireIndex(__dirname + "/rules" );module .exports = { rules : { 'group-import-decorations' : require ('./rules/eslint-plugin-group-import-decorations' ) }, configs : { recommended : { rules : { 'group-import-decorations/group-import-decorations' : 2 } } } }
完成了对于模块的导出之后,我们将其发布到 npm 方便使用。
1 2 3 npm config set registry https : npm login npm publish
至此整个流程发布完毕。
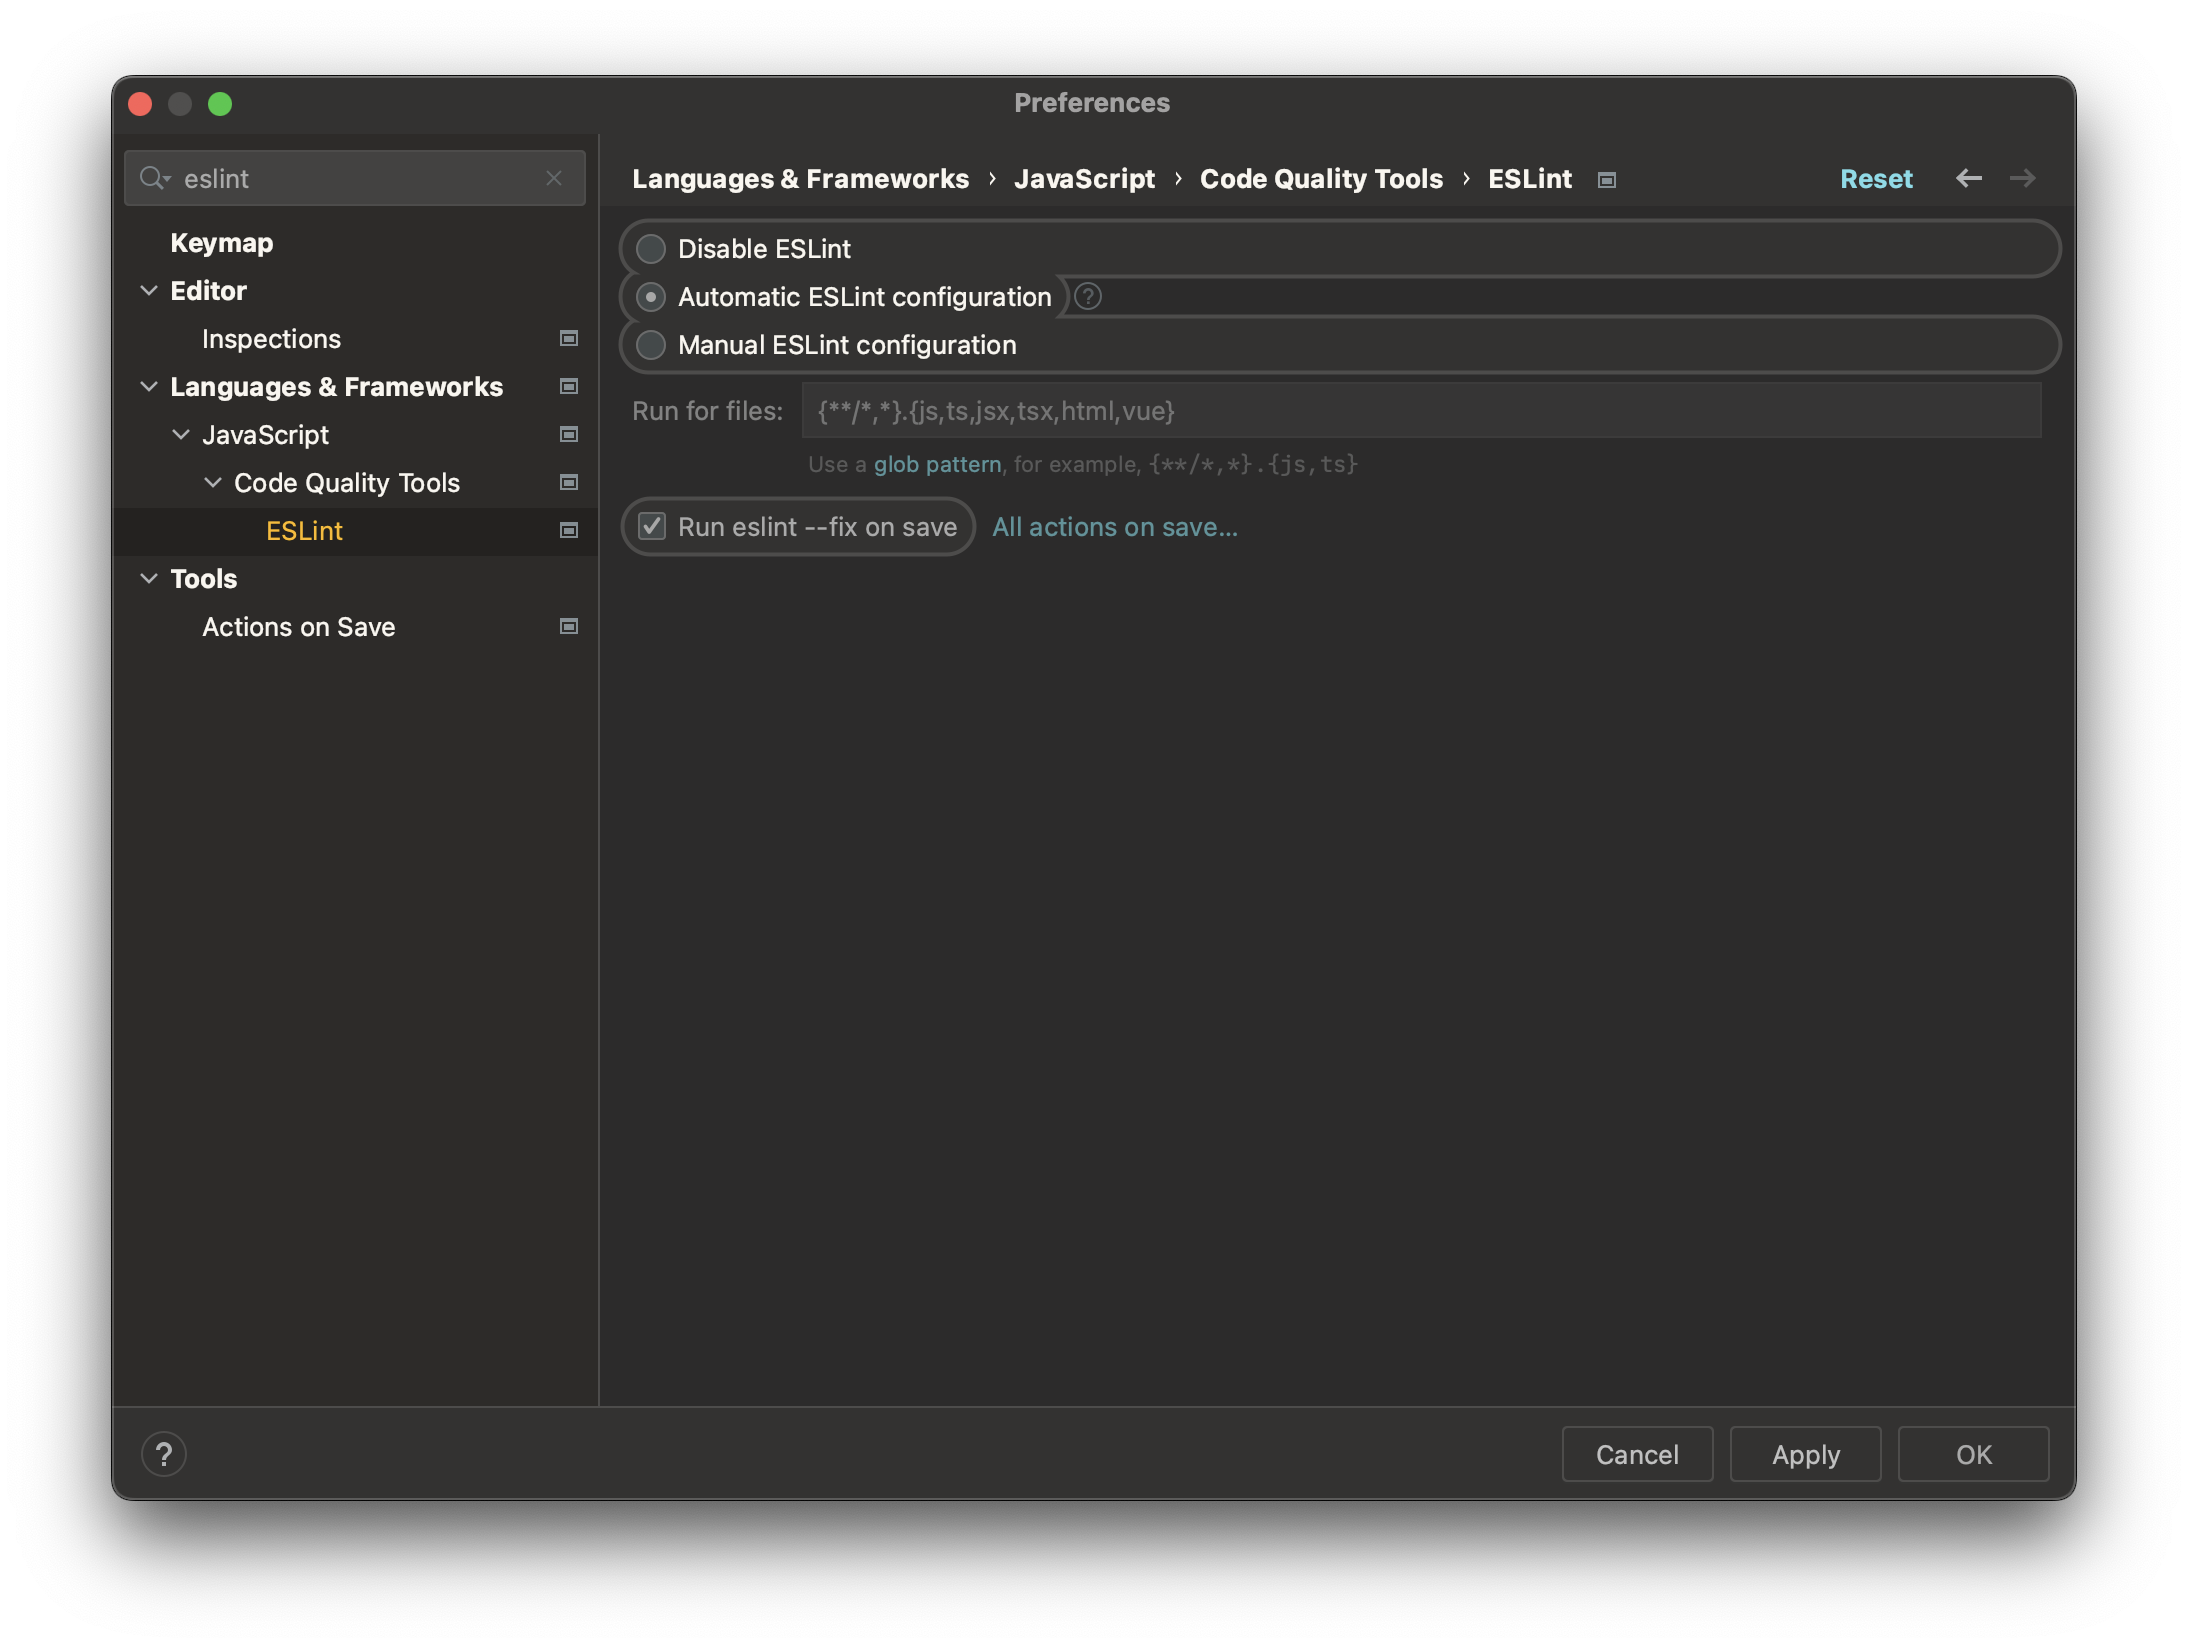
项目中引用 我们编写的是 ESLint 插件,所以为了让其生效,我们首先需要在 VSCode 或者 WebStorm 中启用对 ESLint的支持,对 VSCode,我们需要安装 ESLint 插件,而 WebStorm 内置了 ESLint ,我们在 Preference 中搜索 eslint 并打开即可。
在 devDependencies 装好 npm 包之后在 .eslintrc.js 文件中配置如下内容,指定我们的 rules。
1 2 3 4 5 6 7 8 9 10 11 12 13 14 15 16 17 18 19 20 21 22 23 24 25 26 27 28 29 30 31 32 33 34 35 36 37 38 39 40 41 42 module .exports = { "env" : { "browser" : true , "es2021" : true , "node" : true , }, "extends" : [ "eslint:recommended" , "plugin:react/recommended" , "plugin:@typescript-eslint/recommended" , "plugin:group-import-decorations/recommended" ], "overrides" : [ ], "parser" : "@typescript-eslint/parser" , "parserOptions" : { "ecmaVersion" : "latest" , "sourceType" : "module" }, "plugins" : [ "react" , "@typescript-eslint" , 'import' , "group-import-decorations" , ], "rules" : { '@typescript-eslint/no-var-requires' : 0 , "group-import-decorations/group-import-decorations" : [ 2 , { "react" : "^react" , "style" : ".(css|scss|less|sass)$" , "layout" : "@layout/" , "pages" : "@pages/" , "common" : ".(png|jpg|jpeg|svg|gif|json)$" , "hooks" :"/hooks/" , } ], } }
配套源码地址 npm https://www.npmjs.com/package/eslint-plugin-group-import-decorations
github https://github.com/fl427/eslint-plugin-group-import-decorations
参考 Working with Rules - ESLint - Pluggable JavaScript Linter
Working with Plugins - ESLint - Pluggable JavaScript Linter
Working with Rules
eslint插件开发教程
一文助你搞懂 AST_且听风歌的技术博客_51CTO博客
AST抽象语法树 - 简书
AST节点介绍 - 简书
http://www.goyth.com/2018/12/23/AST/#ArrayExpression
Astexplorer: 一个web工具,用于研究由各种解析器生成的AST。
什么叫AST抽象语法树?
Eslint 核心概念 & 自定义 plugin 开发
ESLint 工作原理探讨
Eslint 的 fix 功能是怎么实现的